
If you’re new to crochet, looking at a crochet pattern for the first time can feel like trying to read a completely different language. You’ll see abbreviations such as sc, dc, hdc, ch, and sl st, along with numbers, parentheses, brackets, and symbols.
The good news is that crochet patterns become much easier once you understand how they’re organized.
In this beginner’s guide to reading crochet patterns, we’ll explain the most common crochet abbreviations, pattern instructions, stitch counts, repeats, and other important details you need to know before starting your next project.
What Is a Crochet Pattern?
A crochet pattern is a set of instructions that tells you how to create a crochet project.
Depending on the pattern, it may include:
- Materials and yarn requirements
- Recommended crochet hook size
- Yarn weight
- Gauge information
- Crochet abbreviations
- Step-by-step instructions
- Stitch counts
- Special techniques
- Finished measurements
- Photos or diagrams
Before picking up your hook, it’s a good idea to read through the entire pattern once.
This helps you understand what you’ll need and prevents surprises halfway through the project.
1. Start With the Materials Section
Most crochet patterns begin with a list of materials.
You may see something like:
Materials:
- Medium-weight yarn
- 5 mm crochet hook
- Yarn needle
- Scissors
- Stitch markers
Pay attention to the yarn weight and hook size, because changing them can affect the final size and appearance of your project.
If you’re substituting yarn, try to choose a similar yarn weight and fiber type whenever possible.
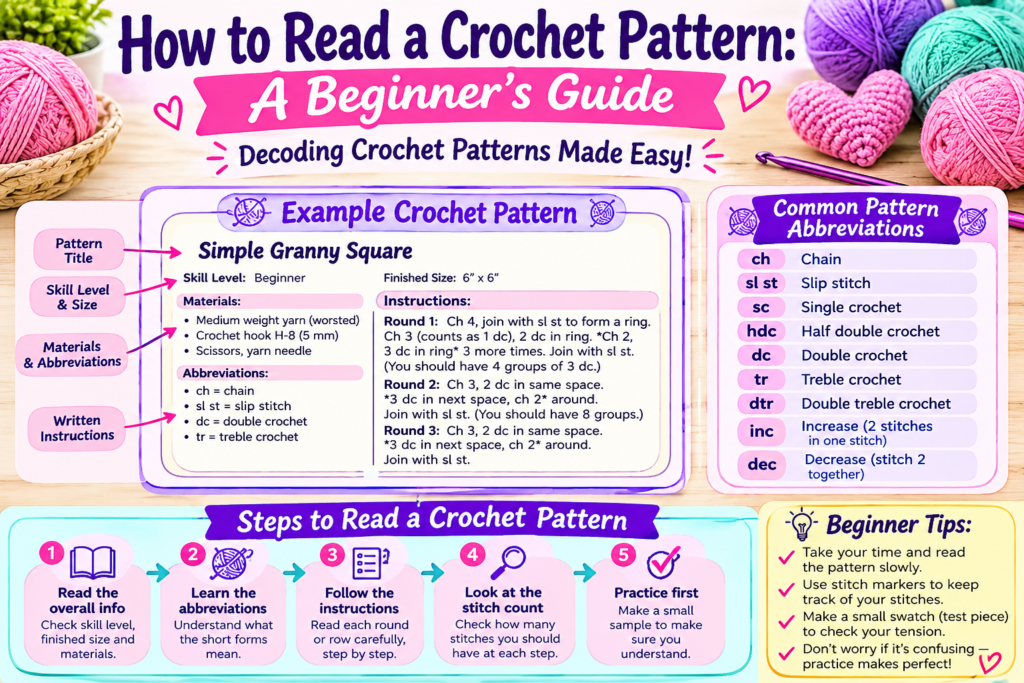
2. Understand Crochet Abbreviations
Crochet patterns use abbreviations to keep instructions short and easy to follow.
Here are some of the most common ones:
| Abbreviation | Meaning |
|---|---|
| ch | Chain |
| sl st | Slip stitch |
| sc | Single crochet |
| hdc | Half double crochet |
| dc | Double crochet |
| tr | Treble crochet |
| st | Stitch |
| sts | Stitches |
| sk | Skip |
| rep | Repeat |
| inc | Increase |
| dec | Decrease |
Different designers may use slightly different abbreviations, so always check the pattern’s abbreviation key when one is provided.
3. Learn How to Read Stitch Counts
Stitch counts tell you how many stitches you should have after completing a particular row or round.
For example:
Row 1: Ch 15, sc in the 2nd ch from hook and across. (14 sts)
This means you should have 14 single crochet stitches when you’ve finished the row.
If you count your stitches and only have 13 or 15, something went wrong.
Checking your stitch count regularly is one of the easiest ways to catch mistakes early.
4. Understand Parentheses and Brackets
Parentheses and brackets are commonly used to show instructions that need to be repeated.
For example:
(sc, dc) in next stitch, repeat across
This means you repeat the instructions inside the parentheses as directed.
You might also see something like:
(2 dc, ch 1) 5 times
This means you work 2 double crochet stitches, chain 1, and repeat that sequence five times.
Always read the words immediately following the parentheses to know how many times you should repeat the instructions.
5. Learn What “Repeat” Means
Patterns frequently use phrases such as:
- Repeat from *
- Repeat across
- Repeat around
- Repeat rows 2–5
- Rep until the end
These instructions save space by avoiding the need to write the same instructions repeatedly.
For example:
Sc in next 3 sts, dc in next st; repeat across.
You would repeat that sequence until you reach the end of the row.
6. Understand the Asterisk (*) Symbol
An asterisk is often used to show where a repeated section begins.
For example:
*Sc in next st, dc in next 2 sts, sc in next st; repeat from * across.
The asterisk tells you where to return when the pattern says *“repeat from .”
This can look confusing at first, but you’ll quickly become familiar with it.
7. Pay Attention to “Work in” Instructions
Crochet patterns often tell you exactly where to insert your hook.
You might see instructions such as:
- Work in next stitch
- Work in back loop only
- Work in front loop only
- Work around the chain
- Work into the chain space
These details are important because inserting your hook into a different part of the stitch can change the texture and appearance of your project.
Don’t skip these instructions.
8. Understand Turning Chains
When you’re crocheting rows rather than rounds, you’ll often need a turning chain before beginning the next row.
For example:
Ch 2, turn.
This means:
- Make two chain stitches.
- Turn your work.
- Begin crocheting the next row.
However, the number of chains and whether the turning chain counts as a stitch can vary between patterns.
Always follow the specific instructions provided by the designer.
9. Learn the Difference Between Rows and Rounds
Crochet projects can be worked in rows or rounds.
Rows
When working in rows, you usually crochet back and forth, turning your work at the end of each row.
This is common for:
- Scarves
- Blankets
- Dishcloths
- Flat panels
Rounds
When working in rounds, you crochet around the project continuously or join each round.
Rounds are commonly used for:
- Hats
- Bags
- Amigurumi
- Circular motifs
Pay attention to whether your pattern says row or round, because the instructions can be quite different.
10. Understand Gauge
Gauge tells you how many stitches and rows should fit into a specific measurement.
For example, a pattern might say:
16 stitches × 12 rows = 4 inches
This means that 16 stitches and 12 rows should measure approximately 4 inches using the recommended yarn and hook.
Gauge is particularly important for projects where size matters, such as:
- Sweaters
- Cardigans
- Hats
- Gloves
- Clothing
If your gauge is too tight, you may need a larger hook. If your gauge is too loose, you may need a smaller hook.
11. Don’t Ignore the Pattern’s Notes
Some patterns include a Notes or Special Instructions section.
This might explain:
- Whether turning chains count as stitches
- How to join rounds
- Special stitches
- Color changes
- Where to place stitch markers
- How increases or decreases are worked
Read this section before starting. It can prevent a lot of confusion later.
12. What Does “Fasten Off” Mean?
When a pattern tells you to fasten off, it means you’re finished with that section of crochet and need to secure your yarn.
A simple way to fasten off is to:
- Cut the yarn, leaving a tail.
- Pull the yarn tail through the final loop.
- Tighten gently.
- Weave the remaining yarn end into the project with a yarn needle.
Don’t simply cut the yarn without securing it, or your stitches may unravel.
13. Don’t Panic When a Pattern Looks Complicated
A crochet pattern can look intimidating when you see several lines of abbreviations together.
Instead of trying to understand everything at once, break the instructions into small sections.
Read one instruction, complete it, and then move to the next.
For example:
Ch 20 → Row 1 → count stitches → Row 2 → repeat
Taking the pattern one step at a time makes complicated instructions much easier to manage.
14. Keep Track of Your Progress
When a pattern has many rows or rounds, it’s easy to lose your place.
You can use:
- A stitch marker
- A row counter
- A pencil
- A printed copy of the pattern
- Notes on your phone
If you’re following a digital pattern, consider marking each completed row so you know exactly where you stopped.
15. Practice With Simple Patterns First
If you’re completely new to crochet, don’t start with the most complicated pattern you can find.
Choose a simple project that uses basic stitches and straightforward instructions.
This will help you become comfortable with:
- Reading abbreviations
- Counting stitches
- Following repeats
- Understanding turning chains
- Recognizing crochet stitches
Once these skills become familiar, advanced patterns will feel much less intimidating.
Final Thoughts
Learning how to read a crochet pattern is an important milestone for every beginner. At first, abbreviations and symbols may seem confusing, but they become much easier once you understand what each one means.
Start by learning the most common crochet abbreviations, pay close attention to stitch counts, understand pattern repeats, and always read the notes before beginning.
And remember: you don’t need to understand an entire pattern at once. Take it one row or round at a time, and don’t be afraid to look up unfamiliar terms.
With practice, you’ll eventually be able to pick up a crochet pattern and understand exactly what your hook needs to do.